Monday, January 31, 2011

First Ever Blanket Party! WOOT WOOT! :)

It's party time!  I'm so excited! :) A BIG thanks to Megs for all the help!  Don't forget each Monday you can see a special blanket tutorial!

 
Here is my blanket that I've made for Project Linus
Thanks to the gals over at Thread This Fabric for the fabric donation! I lined it with some green minkee. 

I love it.  So luscious!

And this was just a quick flannel blanket I whipped up last night. I figured - I needed one for a boy and one for a girl right? :)

I love the fabric!  They're nursery rhymes!  How cute huh!?
And I got a few great packages in the mail this month too!

This lovely blanket arrived from my friend Christina {2 Little Hooligans}.  Thanks Christina!! She even made a cute little bag!  I love it! 


This blanket was sent in from Kristen Mason!  It's one of the softest things I've ever touched.  Seriously!  Thank you Kristen!!

My Vinyl Designer has graciously donated one HUGE prize to one lucky person! 
With their designs, you can print cards, cut vinyl, embroider, make scrapbook pages, etch glass, and SO much more.  The designs also work on crafting machines like the Silohuette, Cricut, Craft Robo, etc.  We haven't found a software yet that cannot use one of our formats. The designs are like patterns that you can use over and over again.  It's all quite fun!
And...

They are giving their Starter Package Combo out -- that's a $172 value!! WOW!!!

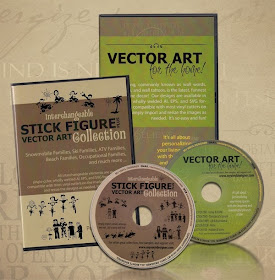
WHAT'S IN THIS PACKAGE?  Two professionally packaged wall word vector collection CDs that house a whole lot of work and love for our typography and illustrative craft!  More specifically, this package includes: 


1- OUR VECTOR ART FOR THE HOME CD
This is a digital compilation of premade sayings, scriptures, quotes, growth charts, clock faces, etc., sprinkled with a few fun clip art images ... it's quite unlike any other wall words vector art package you've seen! It includes our first five 87-design master collections, complete with printable PDF catalogs, blank catalog pages for your own designs, and web-safe thumbnails for marketing ... basically a turn-key vinyl business package. We even added our embellishments collection as a bonus!

2-
OUR STICK FIGURE PLUS COLLECTION
This collection of stick figure vector art graphics is a digital compilation of completely interchangeable stick figure elements ... sprinkled with some tips and how-to's for making adorable stick families. It includes 120 bodies, 84 faces, 14 animals, 131 elements and non-stick family options, a pleasantly designed 5-page PDF catalog, and web-safe thumbnails for marketing. We even added a PDF customer order form for businesses.  It's truly the cleanest, most optimized stick figure vector design collection on the web!

Basically you get not only the tools to make cool projects like this

And this...

And this...

But they also give you everything you need to start your own business.  They are some really great ladies who have great projects and really want to help other women out there!  There are lots of business resources on their site!

Want to win?!?!?!? Of course you do!

All you have to do is link up a blanket you've made over at Today's Top 20! Then, visit My Vinyl Designer and leave a comment about what you would make if you won. 

Have you or do you have signed up to be a blanket guest poster?  Then add a second comment telling me either have posted or you are scheduled to post. {Want to schedule a post?  Email me - amandaandandy(at)yahoo(dot)com  I'll get you scheduled and you can add a second entry!}

Or if you are either Christina or Kristen {or your blanket is currently in the mail...} add a third comment!  Easy stuff!  One lucky gal will win via random.org.

The winner will be announced on Friday! Good luck!!  I can't wait to see all of your blankets!

Friday, January 28, 2011

Blog Printing

Meg did a fabulous post back in January about blogging.  As an avid blogger and blog-to-booker, I figured I'd entice you even more to print those babies out!!  I started my blog shortly after my husband and I were married and haven't regretted it as it's become our journal of sorts.  I actually wish I would have started one earlier.  Don't get me wrong, I was an avid journal keeper and scrapbooker before, but blogging has made it possible to combine the two efforts in an easier, more organized, AND MORE COST-EFFECTIVE way.  Don't believe me?  That's okay, you don't have to...yet...  Here are the three individual posts I have posted on my family blog about the books I have printed (if you're interested).  If not, continue reading here and most of the information will be re-capped.

**Please accept this apology in advance for sounding like an infomercial.  Just know I wasn't paid a single red cent for this little "advert."**

My blog books have ranged anywhere from $130-$170 and that includes the shipping fees.  I receive them about a week after ordering and have never been disappointed.  EVER.  Back in my scrapbooking days, I decided to see how much one of my uber-cute-creative books was costing me.  I had worked at a summer camp, printed all my pictures, and was ready to scrapbook the three-month adventure.  When all was said and done, it was $350+!!!!!  That's right.  For a three-month scrapbook, I was out a load of cash and had one more 12x12 3-inch binder to store.  Granted, it's wonderful, way cute, and I love looking at it constantly.  But I'll be completely gutted if my home floods or burns down because it's the only copy I have.  Oh, and I have nearly twenty other scrapbook binders just like it.

Enter:  BLOG BOOKS!  I can digitally scrapbook my pictures if I want, but don't have to.  The pictures can be added to pages just as they are as well.  And the image can be as big or as small as I'd like.  For example, we took a trip to Europe last October.  Those pages look like a full-fledged travel book with the images taking up full pages.  So pretty.  Have I mentioned that I don't have to clean up the mess after scrapbooking as well?  It's glorious.  I can print a book at the end of each year for less than half the cost of my three-month camp scrapbook.  I can print another copy if the one I have is destroyed.  It takes up less than an inch of bookshelf space (and they're 200-350 pages).  Seriously, what's not to love?  There are many companies willing to print the blog for you (Meg listed a few in her post).  I use Blurb and love it.  My cousin uses Blog-2-Print and loves it.  I am also working on a book of our wedding pictures because to have a gorgeous hardbound wedding book done by your photographer can be nearly $600!!!  That's ridiculous.  I am also planning to print out my blogged recipes into a book so I can literally throw away all those other recipe books I have cluttering my kitchen.  Having one with all my favorites in it is all I need.

Anyway, if you have blog-to-book questions, just let me know.  I'd be more than happy to answer them!

Legit Paper Snowflakes

Cutting paper snowflakes is probably one of my very favorite winter crafts.  Even though most people only find it acceptable to hang snowflakes before Christmas, I feel as though they make great "winter" decor.  I've been doing it for years and I wont lie...I totally pride myself on them once finished. You'll need loads of blank 8.5x11" paper and a pair of nice, sharp scissors.
Step 1:  Place the paper in front of you, portrait-style.
Step 2:  Fold in half.  Be sure to crease your edges really tightly.  I pinch the paper between my fingernails, or rub the handle of my scissors over it.  The flatter your folds lay, the easier it is to cut later.
 Step 3:  Find the center of the FOLDED edge (just bring your folded corners together and pinch the center).
 Step 4:  This is the most difficult step and takes a few tries.  You need to fold the paper into triangular thirds from the center point you pinched earlier.
 Step 5:  This is the "finishing" to the triangular thirds step from above.  Be sure your edges match up.  If they don't, just re-fold it until you get it right.  You don't want any extra space between the folded edges.
 This is what the finished product looks like after being folded into triangular thirds.  I call it the fox head or pointy heart when teaching it to children.
Step 6:  Fold the fox head/pointy heart in half leaving the flap on the top.
 This is what your folded fox head/pointy heart should look like.
 Step 7:  Cut along the folded flap on the top; you're basically cutting off the fox ears here.
 Step 8:  Cut your snowflake!  The more paper you cut, the better your snowflake will turn out.  Remember to cut large shapes AND small shapes.
 Step 9:  Unfold your snowflake very carefully so it doesn't rip.  Folding your edges in the opposite direction also helps to lay the paper more flat.
 Step 10:  Hang them in your window and enjoy!
Now you can practice, practice, practice and be ready for next winter!

Thursday, January 27, 2011

Carousel Horse Crayons

We have the biggest party of the year
going on on Saturday. It's my little miss'
second Birthday! ( I still can't believe she will be 2!)
Anyway, I have been doing lots of little projects
to get ready for the big day.
We are having the party at an outdoor carousel,
she is obsessed with carousels!
I found a cute carousel horse candy mold
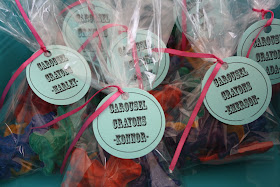
that I decided to use to make crayons as favors!

I started by separating a few boxes of crayons by color

I took the wrappers off, broke them into little pieces,
and melted them on the stove like so:

I then poured the wax into the mold, put them
in the freezer for a few minutes and...
Voila!

All packaged up with tags (so no one think they are candy)
and ready to give away to our little guests!

Tune in next Thursday for pictures of the party!

Wednesday, January 26, 2011

Money Saving Ideas You May Not Be Doing Now

I love to save money, but then again, who doesn't? I thrive on a growing bank account and financial freedom. You could say I am something of a compulsive saver. I do all the big money saving things like being debt free (except for our mortgage), shopping sales, ect. That being said, I have found many little ways to save a ton of money! Here are some of them:

1- Make my own household cleaners and laundry soap.
This is also more environmentally friendly and non-toxic to kids and pets.

2- Make most things from scratch (seasonings, mixes, cream soups, ect.)
Also healthier...

3- Reuse ziploc bags
Just rinse them out, turn them wrong side out, and toss them in with your whites
(Do not dry!).

4- Rinse out vacuum filter instead of always buying a new one.
I do have to break down and buy a new one every 2-3 years.

5- Use cloth diapers, and make them yourself.
I didn't do this with my first, but my second will be cloth.

6- Make your own deodorant
Some people cringe at this one, but it works, promise! Also, it doesn't contain
aluminum which has been linked to Alzheimers and other neurological disorders.

7- Make your own frozen meals including pizza
Every time I make a meal that can be frozen (lasagna, casseroles, enchiladas, etc.), I
make 2 or 3 times the amount and throw it in ziplocs in the freezer. On days when
I am behind or just don't feel like cooking, I have an easy back up that is cheaper and
healthier than fast food.

8- Make your own granola bars
I have been doing this for a while now, and my family loves them. I love that I can
control the amount of sugar that goes into them, and they don't contain
preservatives.

9- Make your own bread
This is especially good for me because I can't have gluten and specialty breads are
expensive.

10- Make soup at least once a week
My family loves soup, which is a good thing because we have it a lot. In fact, I
make large batches of soup in the fall when vegetables are still cheap, and we have
them to eat all winter long. It's nutritious and makes ingredients go a long way.

For the next three weeks I will be featuring recipes and tutorials to go along with this list, so stay tuned for those.

What little known ways does your family save money?

Tuesday, January 25, 2011

Valentine Gift Box Printables

I used the blog backgrounds that I made earlier to make some Valentine gift box printables!

I've seen these before and found a free template for it at PaperCraft Art Creative. I used their idea but incorporated my backgrounds in my own template to make some that have Valentine patterns and a fun matching heart for the top.


Click on the valentine box template that you like, and it will enlarge. Click again to zoom in.
Then right click on the enlarged image to save and then use to print.


 To make your box, follow the instructions on this template that I found.


Today's Creative Blog


CreativeShareWednesdays


Monday, January 24, 2011

Guest Post: Tea Rose Home and her Swaddle Blanket

I just love Tea Rose Home.  Sachiko is seriously talented!  And I was so excited she agreed to post today! :) You have to check out her blog.  Everything she makes turns out amazing!!
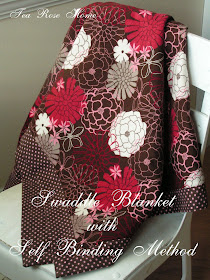
Hi everyone! I am Sachiko from Tea Rose Home. On my blog I share sewing, quilting, repurposing ideas (and don't miss the free tutorials!) and sometimes yummy recipes too. I host link parties every Wednesday. If you love to see what people are working on and want to be inspired, come visit me and join the fun!

Amanda asked me to be a guest blogger for her blog, and I am totally honored to be here. Thank you for inviting me Amanda!

Today, I am sharing a tutorial for a self binding method to make swaddle blankets. I hope you will enjoy it!

I have made so many blankets in the past. I think this is one of the most easiest ways to make baby blankets. It might be a little confusing at first, folding the corner, but once you get used to it, you can finish a blanket in no time!


{You will need}

1- 43" X 43" flannel (It was 44" wide flannel, I cut off the sides to get rid of the writings and thickness. This fabric will be the outer border.)

1- 36" X 36" flannel

Matching thread

{How to}

1. Mark the middle for all sides for both fabrics. Lay them together with right sides together. First, pin the middle of the four sides. Then pin the edges starting in the middle make your way outwards to the corners.


2. Start sewing using 1/4" seam allowance. Remember to leave a 5" opening for you to turn the fabric inside out later.


3. Fold the corner. Draw a line to help you to know where to sew. Use the picture as a guide.


4. Cut the excess off. Repeat the process for the other corners.


5. Press the seam towards the outside with an iron.


6. Turn the fabric inside out. Iron. Pin the opening and top stitch all around the blanket.


7. Ta-da. That's it!


Wasn't that fun? I have been going through my stash and made some in the past few weeks. They always come in handy for baby showers and such. I hope you enjoyed the tutorial!

Saturday, January 22, 2011

Update!

Starting now, all of our contributors are free to post about whatever creative topic they want!

We are also starting a Creative Spotlight Week each month when we will each feature blog posts/blogs that stand out from the crowd and will be awarded a Creative Spotlight Award. A link to their blog/post will be indexed in our Creative Spotlight Award section that we will be adding!                                 

Friday, January 21, 2011

Creamy Vegetable Soup

1/2 c. butter
1/2 c. flour
1 onion, diced
4 c. milk
1 head cauliflower, chopped
2 carrots, chopped
1c. peas
1 c. corn
1 lb. bacon, cooked and crumbled (omit for veggie version)
8 oz. cheddar cheese, shredded
salt & pepper to taste

Boil cauliflower and carrots in water (or chicken/vegetable stock) until fork tender; drain them when they reach your desired "doneness." Saute onions in melted butter in a large pot. Add the flour to make a roux; cook briefly. Slowly stir in the milk until the mixture is smooth. Incorporate all veggies, bacon, and shredded cheese. Stir constantly until cheese has melted thorough. Add salt and pepper to taste. Even though this recipe was done with onions, cauliflower, carrots, peas, and corn, other veggies could be added or taken for a similar dish (broccoli, potatoes, etc.).

Thursday, January 20, 2011

Sweet Striped Nursery turned Big Girl Room

Two years ago today was my due date, unfortunately
my little miss was extremely fashionably late (10 days).
But regardless, it was time to turn her nursery into
a big girl room.
Here is her sweet swiped nursery before:

and here is the after:

Sorry for the lack of natural light, I actually kind of like it,
I think it makes it look extra cozy and welcoming!
The room was a hodge podge of DIY projects,
that came together quite nicely.

Here is a $10 side table I bought:

And here it is with a fresh coat of paint and some
Anthropologie handles:

The headboard, pillows and bedskirt were made.
The bedding was not.

It's girly, it's cozy, it's calm, and it's sweet!

So my budget for the project was $100 which made for
some creative projects. But luckily I could re-use a few
things from the nursery, and the bed was a hand-me-down.
So here's the breakdown:
DIY Bedskirt- $9 (can't beat $3/yd fabric!)
Bedside Table- $10 (had the paint)
Knobs-$16 (splurge!)
Sheets- $12
Comforter and Sham- $42
DIY Lamp- $4 (had the shade)
Wooden Bunny- $5 (West Elm)
DIY White ruffled pillows-FREE (had fabric)
Tan Pillow with Doily- had in nursery
Monogram Sign- had in nursery
Curtains- had in nursery (Pottery Barn Outlet)
Rocking Horse- had in nursery
Rocking Chair- gift from Grandparents

TOTAL COST $109
I know, I went over, but only by 9 dollars,
so I'm ok with that!

Linking up with: