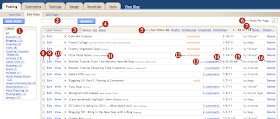
To get to your tabs: If you go to your blog URL, and sign in on the upper right hand corner, you will be able to log into your dashboard. Your dashboard will look something like this.
If you click on New Post, Edit Post, Comments, Settings, Design, Monetize, or Stats, you will see some tabs on the upper left of the page. You will see that these tabs are labeled with the same names. You can see what tab you are on, and easily go to another tab if you'd like. You will also see View Blog to the right of the tabs, which you can always click on to view your live blog.
If you've gone over Part 1 HERE, you know all about the New Post option where you will go to make each new post.

1. Your post labels, click on one label and it will show all the posts with that label.
2. Type in a word to search and all the posts with that word will show up.
3. If you have selected a box for a post (shown as #8 on here) you can add a label to a post without actually going into the Edit mode. Select the post box you want to create a label for and scroll down here to select a label, or make a new label for it.
4. Quickly select All the posts or None of the posts.
5. You can narrow the posts shown by All, Drafts, Scheduled, Imported, or just Published.
6. If you want to view more posts, you can select a higher number here.
7. Go to older posts or the oldest posts.
8. Click on this box to select the post you want.
9. Go into Edit mode for this post.
10. This will take you to your actual post.
11. Click anywhere on the title or label, and it will show you a quick words only view of the post without taking you off of this screen.
12. Shows you whether this post has been posted yet (published), is in progress (draft), scheduled to post later, etc.
13.Click here to see the comments that go with this post.
14. This shows you when the post was or will be posted.
15. This shows you who created the post.
16. Click here to delete your post. It will ask you if you are sure you want to delete it, so don't fear if you accidently click here.
Your next option under the Posting tab is Edit Pages. This option is if you want to make a page for your blog that doesn't show up as a post, such as an About Page or a Contact Page. Blogger will also supply a menu bar with your page links to go wherever you'd like if you don't choose to link manually when you save your page. You can select where to put your menu bar under the Design Tab, which we'll get to later. I also wrote a post earlier that shows you how to make your pages as well as your own decorative buttons to link to your pages. You can find that post HERE.
Your Comments tab has only two options under it, Published and Spam.
Hope this helps all you beginners, and that you are all loving blogging!


coach outlet clearance
ReplyDeletelacoste pas cher
nike store uk
ray ban sunglasses
cazal outlet
nike air max 90
prada shoes
ugg outlet online
michael kors canada
true religion jeans
coach outlet
coach outlet
mbt shoes
polo ralph lauren
adidas trainers
ralph lauren uk
cheap uggs
ray ban sunglasses
michael kors handbags
longchamp handbags
canada goose outlet
ferragamo shoes
coach outlet
mlb jerseys
coach outlet online
abercrombie outlet
adidas uk store
reebok outlet store
ugg outlet
lululemon outlet
ferragamo outlet
michael kors outlet
ugg outlet
nba jerseys
ugg boots
20160827caihuali
20181006 junda
ReplyDeletepolo outlet
christian louboutin outlet
ysl outlet
christian louboutin shoes
chrome hearts outlet
kate spade outlet
pandora jewelry
ugg outlet
air jordan 4
dc shoes